


Will you opt for a classic deadwood construction, or get creative – even weaving in living elements for the long term? Either way, a dead hedge is a win-win for your garden and its wild life.
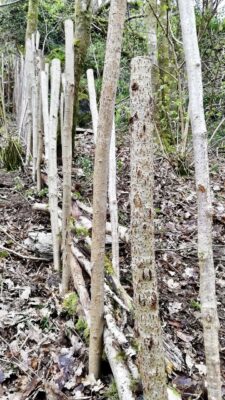
Angry autumn and winter storms harried and toyed with my garden’s boundary fence, leaving sections of it weakened, wobbly and damaged. The original fence is made entirely of sweet chestnut; the posts support horizontal rails to which palings, of differing lengths, are individually wired.
This irregular, less formal look is a good fit for my edge-of-woodland setting, blending in beautifully; much of the chestnut is now adorned by clean-air-loving lichens. But time ticks on; the fence went in 20 years ago, and no timber lasts forever.
Mercifully, my garden is protected from the fiercest direct south and southwesterly blasts, but high winds can still get up to all sorts of antics. It’s the slow, relentless buffeting that quietly does the damage, sending deceptively sound posts toppling over without warning.
My interim measure is to drive a new half-round stake in next to one with a weak, about-to-snap-off base, and screw them together. It buys me some time, and the local woodpeckers drum their thanks, glad to have a decaying, grub-riddled post to hammer away at. Wasps are fans, too, rasping at the ageing chestnut, to pulp it for nest-making.
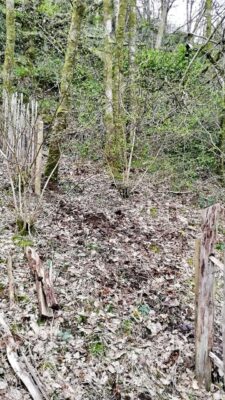
The fence at the far end of the garden is on a steep slope that’s slippery in wet weather (it’s prime territory for hip dislocation). Our interminably wet autumn, then winter, then early spring, pushed a lot of outdoor work back (and back and back…), including fence repairs. The biggest storm-ripped gap opened up, predictably, on the steepest part of the boundary. This was more than just a wobbly post job; it had turned to mush and keeled over.
The original fence was designed to keep out both sheep and rabbits. In two decades I have only ever seen one rabbit in the garden (it saw me and shot off), and thankfully I’ve never had a woolly incursion. But a few wild-eyed, hungry feral ewes always come down from higher ground in winter and spring, so I wasn’t going to chance it.
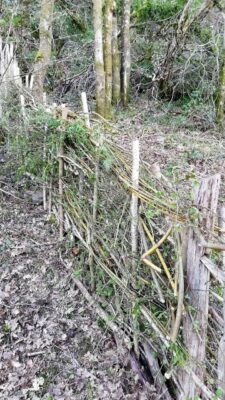
With few salvageable palings left, I needed a quick and easy gap-filler that wouldn’t cost a penny and which I could construct using abundant a-few-steps-away wild hazel and my own pollarded willows. So I went for a dead hedge – or is it a dead fence? You can decide. I got so carried away building it, it almost felt like a work of art.
Dead hedges are dead easy to plan and build, they’re quick to install and they work a treat – and I’m thanking the gardening goddesses for offering up such a simple, beautiful solution to a sudden, gaping problem.
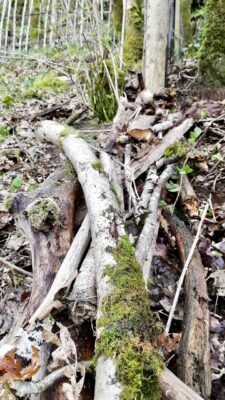
I started by marking out the line of the hedge using the old rotted post and other nearby dead wood. This wasn’t essential, but it will be cool, damp habitat for wild life passing through the garden. My long-term goal is to eventually spare my hips by establishing a living wild hedge around most of the garden’s boundary, so this was a perfect chance to bend down some long stems of nearby hazel and layer them into the soil beneath, anchoring them with chunks of rock. These will root and become bound into the dead hedge, eventually creating a live, dense, trim-free one.
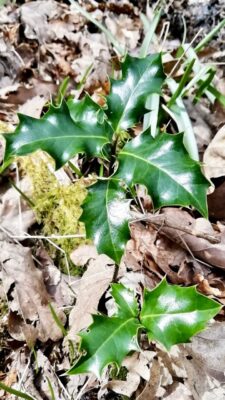
Serendipitously, a holly sapling was growing in the hedge line, so I trod with care. I’ll add more sapling hazels and hollies, plus some blackthorn suckers, all of which will grow happily in the oak’s dappled shade, and deter even the feistiest ewes. Wild honeysuckle (the cuttings are already taken) will climb and bind the hedge, filling the summer air with scent.
For ‘posts’, I harvested straight(ish) poles of hazel and willow around 5cm in diameter and 120cm to 150cm long. I started the holes with a crowbar, then drove each pole in using a sledgehammer until it felt firm. One of the beautiful aspects of dead-hedging is that it’s informal freestyle gardening, which doesn’t demand a spirit level or any fretting; you use what’s at hand and go with the flow, learning along the way. Forget perfect alignment! I aimed for a gap between the two lines of poles of 10cm to 15cm, but I didn’t obsess over it. The poles were springy at this stage, but that soon changed when I began adding the filling.

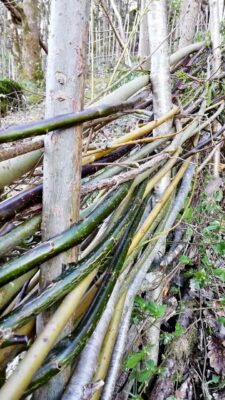
In a basic dead hedge, the gap between the posts/poles is simply filled up with horizontal layers of woody prunings and other brash – the longer the shoots, the better. I used a mix of just-cut hazel and colourful willow, plus some dead wood from downed oak limbs, including some thicker sections to start off with. It was then a case of simply packing the layers down and adding more. The filling soon pushes out against the poles, filling the gap, and the whole structure quickly begins to feel solid and firm.
Weaving some of the longest shoots in and out of the poles gives the whole hedge more strength. This is where I got swept away artistically. I entered full weave mode, using the pretty willows, along with hazel, as if I were charged with weaving a basket fit for a gardening giant. It was certainly immense fun and incredibly therapeutic, with just-arrived pied flycatchers and blackcaps serenading overhead, plus much-missed sunshine. I did make sure to lay in plenty of twiggier material, mostly hazel, but you can use whatever you have.
Dead hedging can be supremely useful, even in an urban garden; woody prunings get another lease of life, helping to reduce garden ‘waste’ miles and mute annoying shredders, while creating sanctuary for wildlife to boot – a space for feeding, roosting, nesting and hibernating, and to allow easier garden-to-garden passage for hedgehogs and other ground travellers. Minutes after I’d stopped primping my dead work of beauty, the wrens went in.
My biggest tip? Don’t faff about. Gather up your materials and the few tools needed, then crack on with the building, weaving, layering and packing down, allowing your inner artist’s eye to guide you (like me, you are allowed to get carried away).
So, what’s your verdict – hedge or fence? Either way, it’s dead easy.
Text and images © John Walker
Find John on X @earthFgardener